Unit 66 - Creating a 3D Model
Instead of using an image to lay onto the image plane as a reference, I used my own initial design, as my model was not being based off a human skeletal structure. So I used more basis shapes, with more polygons to appear more rounded and less sharp.
The methods I used were combining many varying shapes, such as spheres and and cones, and manipulating the vertexes and edges to make more complex shapes or just if I ever needed to manipulate them. As well as this, using the move tool to adjust any placements of my shapes, this made it simple to easily move around objects to place where they're needed to help build the model,. Adjustments would be made using the rotation tool if something needed to be turned a certain way, and for increasing size or morphing a more unique shaped from a cube or anything else.
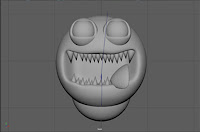 |
| Starting Model / Partial Detail (Front) |
I began with a basic sphere for the entire body, which also happens to be the face. The character itself is an enemy, called "Nozu" which is basically a giant nose that is a sub-boss in the game. The core design was to be based on using spheres for the main body, eye sockets and eyeballs. After I had assigned all of the main face features, I began to manipulate and shift the core sphere by selecting the faces, and pulling them back so they cave inwards, creating the mouth for my model.
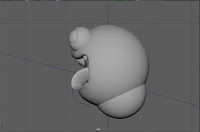 |
| Starting Model / Partial Detail (Side) |
|
Once the mouth had been molded, I then smoothed the mesh so the edges around the mouth looked more appealing with more polygons, making the model seem more fluent and natural. After that was done, I started to add small details to give more flare to the model, creating cone shapes, shrinking them down and fitting them in the mouth to give the look of teeth. Afterwards I followed up by flattening a sphere and stretching it, then applying a bend function to it so it could act as the tongue and placed it in the mouth too.
After I had gotten the key features down, it was time to work on the limbs and more striking features to make the model stand out more and not just be a simple shape all around. I created more spheres for the hands, and stretched others to form fingers and joined them together using a joint function, and parenting them altogether so they moved as one without having any clipping issues. What I did after was create a couple more cone shapes, stretched and bent them, and then stuck to the outer edge of the body. These would be used as the horns, and another larger cone was placed on the backside to give more of a ghoulish look, or even a tail.
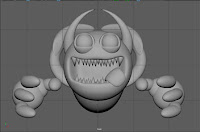 |
| Untextured Model (Front) |
 |
| Untextured Model (Side) |

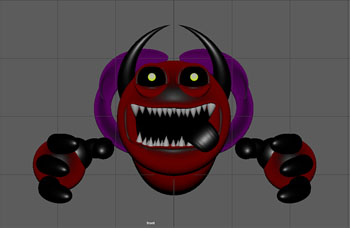
With my model at an acceptable stage in development, I decided to start adding textures. Even if they were simple, I wanted to get a better look at how it would appear with the right colours attached. To do this I right clicked on the section of the model I wanted to apply the texture to, and clicked on "Add New Material...". This then opens up another list of options, displaying a varied number of texture options with their own unique looks and effects to them. The one I wanted was Ramp Shader. This particular texture allowed me to use more vibrant colours.

 |
| Final Model - Textured - Front |
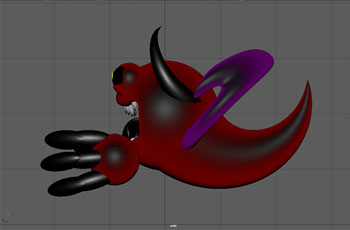 |
| Final Model - Textured - Side |


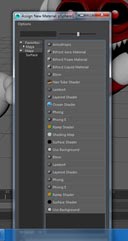 With my model at an acceptable stage in development, I decided to start adding textures. Even if they were simple, I wanted to get a better look at how it would appear with the right colours attached. To do this I right clicked on the section of the model I wanted to apply the texture to, and clicked on "Add New Material...". This then opens up another list of options, displaying a varied number of texture options with their own unique looks and effects to them. The one I wanted was Ramp Shader. This particular texture allowed me to use more vibrant colours.


No comments:
Post a Comment